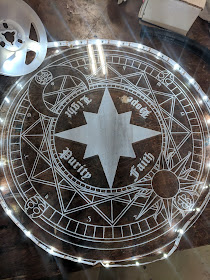
by Stephen "Laika" Sanford
How to Make a Permanent Light-Up Disk for Rituals
Materials needed:
12”x12”x ¼ ” sheet of clear Acrylic
Pure white LED strip 1 meter/39” long with usb end.
USB power bank
5 minute 2 part epoxy
Super glue
Sheet of ⅛” poster board
Sandpaper 60-80 grit and 100-400 grit
Access to a 3d printer and filament (or substitute with wood)
Access to a Laser cutting machine (or etch/cut the acrylic yourself)
The first step is to get your design that you want to etch into the acrylic. You can look online for vector images or make your own. You can either print off the design and scratch up the acrylic yourself or use a Laser cutting machine at your local maker studio. You can find instructions for scratching it yourself online, but for the purpose of this article I'll be talking about using a laser cutter. Your design should be black and white with the colors inverted (anything black will be etched and shows as white on your disc) and a secondary color for vector cutting (red in this case).
Using a laser cutting machine involves two steps: first, raster (etching), then vector (cutting). Rastering can take a long time depending on your image, this project took an hour and a half of etching. Vector cutting often takes only a few minutes. Make sure to do your cutting second as the acrylic may shift and move after it is cut.
If you are 3D printing your frame, you can use a 3D design program to create the necessary files. I used TinkerCad, which is a very simple and free browser based software, but there are many available options such as Onshape or Fusion 360. For this project I had a 12” diameter acrylic circle so I needed to make my frame a little wider than that. For my frame design I went with 318.8mmx318.8mmx14mm for my outside dimensions and 300mmx300x23.25 interior dimensions with a groove on the inside that is 307mmx307mmx8.25mm.(Most 3d printers and design programs only use metric measurements.) If you make your own frame then make sure you have a interior groove that will allow the thickness of your acrylic and is wide enough for the LEDs (most are ¼” wide strips). You also need a hole on the bottom of your frame for your wires from your LED strip to protrude out of and plug into your battery pack. You will need to print with supports and remove them. This frame must be separated into at least 2 parts so that it can be assembled around the etched acrylic plate. You can either cut it down the middle and attach, or leave an overhang open and attach that to your bottom. Due to the size of this project, I was required to cut this design into 4 parts for the build volume of my 3d printer.
Take your LED strip and place it inside the track of the frame, making sure the LEDs are facing in and are tight to the frame. If they are not, you can use super glue to keep the LEDs in place. This can be tricky as you cannot have the frame fully put together until you epoxy the frame together with the acrylic inside. This process can take a half hour or more for the 2 part epoxy to set enough that it is stable, and then several hours to a day for it to fully cure. Once cured, sand all edges starting with a 60-80 grit paper and finishing with a 100-400 grit sandpaper.
Cut out your ⅛” poster board a little bigger than the size of your acrylic and spray paint it if needed (preferably a matte black for contrast). This will go on the bottom of the acrylic so you can see your etched design better and hide your battery pack. Clean the acrylic with glass cleaner and make sure it drys before this next step because any dust or smudges on the acrylic or poster board will be noticeable. Slide the posterboard inside the frame behind the etched side and super glue it in place.
You also need to design a method of holding the battery pack on the backside of project. I designed a holster to be placed on the backside and epoxy in place, however you can get away with other means of attaching it like using a small bag, velcro or even permanently bonding it into place. The LED strip that I bought had a remote control to turn on and dim the LEDs. I designed a holster to fit inside the battery pack holster to keep this control together. Make sure your wires are neat and secured to the board with either velcro or zip ties.
Finally you have to attach the legs for the project. Since my battery pack was 22mm thick and the remote control was 5 mm thick, I printed cylindrical legs to raise the project 29mm off the ground. Then I used 2 part epoxy to secure everything to the frame and let it cure overnight.
There you have it - a finished light up disc.


