by Jason "Aeston" Rosa
The first Ashen Adventures also marked the conclusion of the long-running Nangea storyline and to help make the event feel worthy of a grand finale, Tucker asked for help creating a "sea serpent".
I'm not sure he or the rest of the staff expected something on the scale we created, but Rhiassa wanted to use this as an opportunity to express our thanks for the tremendous amount of work Ashenmark always does to help us with our events. So planning began to create something that really had a "wow" factor to it.
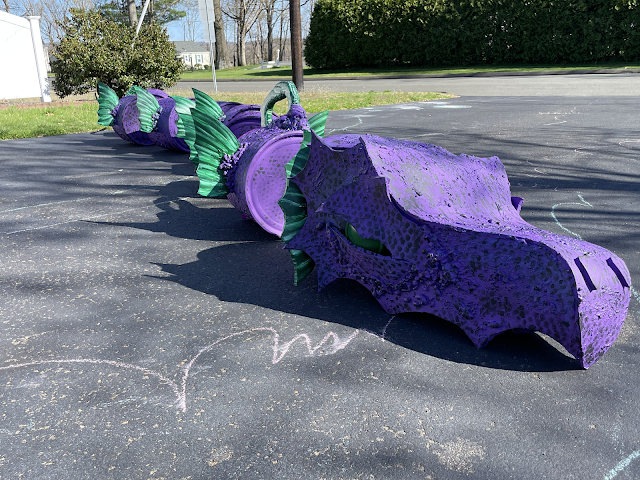
I did my best to capture the whole construction process in photographs so I'd like to take this opportunity to share with you all the journey of constructing the "Gloweed Leviathan" that we affectionately dubbed Long Barney. Team Sea Serpent (myself, Jen, Lani, Nataliya, and Nick) truly enjoyed this entire process and are very proud of the result.

|
| A picture from Echoes of Ragnarok. These cardboard barrels were purchased with the idea that they would be a tree trunk for our event and the body segments for the sea serpent afterwads. |

|
| The barrels are cut in half, the internal structure is the "T" made out of 1" PVC. The pipe sticking out the sides is a specific engineering choice. Expanding foam is being used as the "glue". |
 |
| All the barrels are now set up with the internal supports. The first fin is attached. The EVA foam that makes up the fin has a tab cut into it that is inserted into the PVC pipe on the side and filled with expanding foam in and around to cement them in place. |
 |
The initial shape of the head made of three panels of EVA foam. It was Nataliya's design and execution that gave this head a very organic shape.
|
 |
| Fins on both sides of the tubes are now in place. |
 |
| Another view of the fins on, in the back is the tail piece that has different shaped fins just for the aesthetic. |
 |
| The head is now attached to the cardboard tube with some extra panels to complete the shape and hold it in place. There is a skeleton of pool noodles in there as well to hold it together and keep it from collapsing. |
 |
| The dorsal fin section, the tail, and the tail-tube with its elongated fins. Here you can see the extra texture that was created out of expanding foam to create a more realistic looking skin. |
 |
| More views of the fin attachment and skin texture. |
 |
| Nostrils added to help detail the head. |
 |
| Spraying plasti-dip on the EVA foam fins to make them more resilient and hold paint better. |
 |
| The plasti-dipped head showing the added eye sockets and skin texture. |
 |
| The eyes were tap lights that were painted green. |