Ember the Dragon
Crafter: Shalindra
All photos and text courtesy of Maryanne "Shalindra" English-Bettie

I started with a 6 mm craft foam base of a muzzle, lower jaw, and forehead. The muzzle is one solid piece that comes together at the end of the snout and glued around the roof of the mouth. I used a Dremel to shape the holes for the nose.
The lower jaw is formed from two pieces glued around the base of the mouth. There is an additional piece glued in between to give the thumb something to work against when opening and closing the mouth.
The forehead is formed from three pieces of the 6 mm craft foam, with the eyes cut out and shaped.
Right now, it looks more like an eagle than a dragon, but that will change.

This picture shows the nostrils which were added around the holes for the nose. This is going to be covered with Heatform later on, so I wasn’t too concerned about how pretty this looked. I just wanted to bulk that area up.
It’s starting to look like dragon now.

Scales were individually cut from 2 mm cut form. There are approximately 80 scales on the dragon.
After the scales were applied, I used the heat gun to warp the scales, causing them to lift away from each other. This made the dragon look spikier, as well as make it easy to paint later on.
Once done, the dragon got three coats of Mod Podge all over. This creates a smooth surface to apply Plastidip, which allows for a better surface to apply paint. Plastidip also gives the surface a hardened look, perfect for dragon scales.

With all the nooks created by the scales parting due to the heat gun, I applied a base coat of black acrylic paint. Once dried, I did two coats of red, adding more towards the ends of the scales, as well as contouring the snout and jaw.
Using a sponge removed the noticeable strokes that paint brushes would leave behind.
Two layers lets me highlight areas I want brighter while keeping shadows for depth.

The tips of the scales were highlighted with gold paint, as well as the base of the jaw, adding more depth.
I used the sponge again to keep the look consistent.

After a brief trial with gold horns in which my poor dragon looked rather gaudy, I repainted them black, then dry brushed them with white.
When I shaped the horns, I added some “damage” to one of them. It was intentional, meant to give her some personality.

The Heatform was heated up using a heat gun, then shaped right onto the nose. There are several layers in order to achieve that layered armor effect. This gives a really nice profile, while the thermo-plastic protects the seam on the nose.
Once all applied, the plastic got three coats of Mod Podge before being painted with a base coat of black, then dry brushed with silver. This gives a nice contrast to the red and gold, and lends to the armored look.
At this point, the dragon was sprayed with Kamar Varnish by Krylon. This makes it shiny, as well as protecting it from the elements.

Once shaped, the Worbla was allowed to cool then hot glued into place.
The black leather-look fabric was also sponge painted to match the dragon’s head. There are two coats of the same red, as well as one coat of gold. Tulle netting was sewn into the center seam to look like a fiery mane.
There’s a small pillow towards the tail, to give the body some bulk when in use so it doesn’t look like a deflated eel. Pillow can be removed easily, and the snake-like body wound through and around a belt for easy carrying.
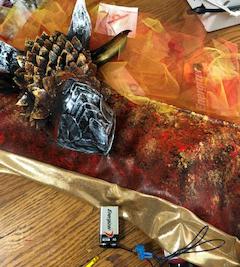
The battery is for the lights in the eyes. There are LED, cool touch. They even blink in and out, making the dragon blink.

The body was sewn to the head, then a slit cut about mid-point to fit my arm. There is a Velcro spot, center of the head in the top to allow access for the light switch as well as to change the battery.
More sponge painting was done on the head and body to create a smoother transition.
Ta-da!
The goal was to create an interactive familiar that went beyond the 4.5” guidelines and would be fun for players and event staff to interact with. This was a bigger project in terms of work than I thought it would be, but I am pleased with the results.