Echoes of Ragnarok: 3D Printing Overview (Part Two)
Alexander "Elouan" Groom
Plastic. It’s very useful. It usually melts at a reasonably low temperature, is lightweight, has a decent strength to weight ratio, and is relatively cheap. As it turns out, though, plastic can also be finnicky. Combine this with new technology that is still being figured out, and you are bound to have some problems.
As I mentioned last week, printing the parts does not end at the software stage. The transition from a digital file to a real object you can touch and hold is not a perfect process; even if the software is perfectly set up according to what should theoretically work, the real world will almost always find a way to interfere.
Sometimes, it interferes in a good wood. The software I was using is set up in such a way that it’s build time calculation is inaccurate; however, it is almost always an overestimate rather than an underestimate. In other words, all of my prints took less time than I expected. This is always good; if you budget your time based on what the computer says, and the computer always overestimates, then you’ll always have a little bit of extra time to work with. However, such a positive difference is rare; most of the differences between the theoretical part and the real one were issues that I had to deal with.
The first issue I had was an issue I had never encountered before. This is bad for me, because it takes time away from actually working on the part; it’s good for you, because it means I have to describe how to approach and solve such an issue. About halfway through printing, the printer would shift where it was printing towards the back of the printer by half an inch. In other words, instead of getting a nice part, I’d get a part that looked like it had been sliced in half, and the top half translated backwards.
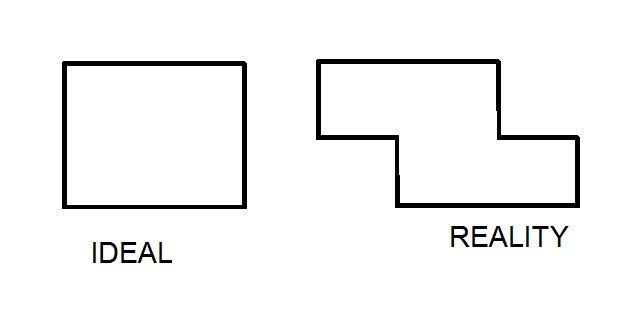 |
| A rough diagram of what happened to all of the parts in the initial build. I had never seen this before, nor had any idea what would cause this. |
A bit of googling of this issue (aside: Google is your best friend when troubleshooting 3D printing problems. A lot of companies don’t have a good FAQ/troubleshooting page for their 3D printer, and some are downright unhelpful, but online forums commonly contain people bringing up obscure issues and the solutions to said issues) revealed that the most likely culprit was a stepper motor driver overheating. I had also found through research that this was a design flaw with the Makerbot Replicator 2X; the driver for the stepper motor did not have a dedicated fan to cool it, and was located in a spot with poor airflow to begin with. Put simply, the printer was getting too hot in a specific spot.
A quick tangent: issues like this happen a good bit, especially when you first start printing with a new printer. Some problems are design flaws that are difficult to test for or see coming, and aren’t address. For example: the SD card slot for the Makerbot Replicator 2X is located inside the build chamber and is vertically oriented. While obvious in hindsight, it might not be apparent during testing (especially given that there are other priorities) that a piece of plastic could easily fall into this, bend the springs pins used to make contact with the SD card, and render the SD card reader on the printer entirely unusable. Other issues are just from the company being rushed, or dealing with the issue in newer models, but not fixing it in older models. Either way, identifying these issues and finding work arounds is part of the art of 3D printing.
My solution to this was to leave the door slightly open during the printing process. The door is simply a piece of clear plastic on a hinge; the printer could not care less whether this door was open or closed. Mostly, the door is there to keep the space warm, so that you use less electricity to heat the part. I was willing to sacrifice some power efficiency to try out this solution. Lo and behold, this solved this particular issue entirely....
...only to leave me with a new issue: stringing. Stringing is when strands of thin plastic connect two different locations on the part. It looks like this:
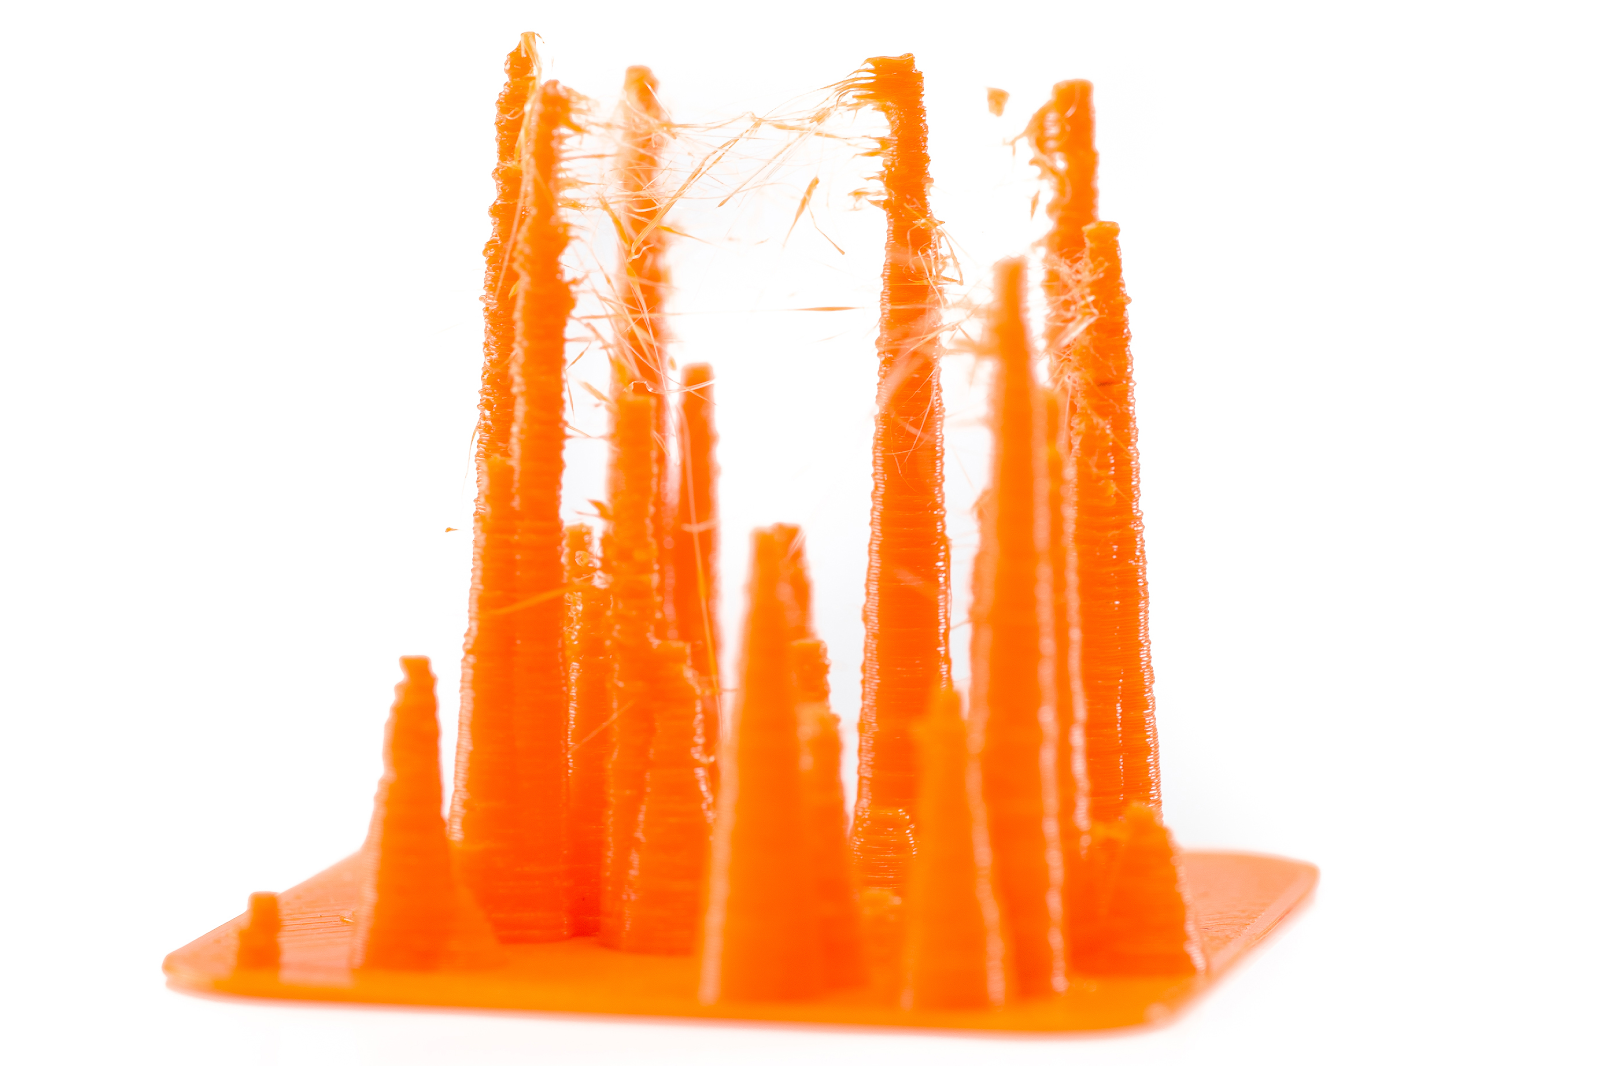 |
| An example of a part with a high degree of stringing. Notice how awful it looks. |
Now, this is mostly an aesthetic flaw, but these parts were designed around looking good and printing cheaply and quickly. I had already sacrificed on structural integrity; I wasn’t going to sacrifice on aesthetics as well. To some extent, this could be removed by hand; however, this would still leave some aesthetic defects, and would be incredibly tedious for the volume of parts we were working with.
There are two ways to solve stringing: lowering the temperature of the extruder, or increasing the retention amount on the extruder. Lowering the temperature makes the plastic solidify more quickly; as such, it tends to stretch less when the extruder moves away from the part. Think of like cheese on a pizza; if you pull away a slice when it’s still hot, you get strands of cheese connecting the pizza to the piece you just pulled away. If you do this while the pizza is cooler, the cheese separates more cleanly. (Can you tell that I am writing this close to my lunch hour?)
The other solution is to increase the retention amount. This is basically how much material the extruder pulls back into the nozzle after it is done printing a particular area. Pulling back more material creates a cleaner separation between the nozzle and the part when the nozzle moves, leading to less stringing.
Ultimately, I decided to start by lowering the temperature. This setting is much easier to change in the software I was using, and my research had produced a number of suggestions on good temperatures to try out. The retention amount is more finicky, and seemed less likely to produce good results on the first try. As I wanted to waste as little time and material as possible, lower the temperature was the right choice.
Thanks to a combination of know how, good research, and a bit of luck, changing the extruder temperature removed the stringing problem altogether on the first try, and the parts printed without any major flaws. However, there were still a number of minor flaws I had to go back and fix. For example, on the vertebrae, there were a number of thin areas in critical areas that might have been fine, but that I wasn’t entirely confident would survive the event. To fix these, I went back to the Solidworks model, and changed these areas so that they were thicker. I then saved these as new .stl files, and reprinted them. This eliminated the problem, and produced satisfactory results.
 |
| The raven skulls and fangs, successfully printed. The fangs show a small amount of stringing on the raft; and one of the rafts misprinted; however, this structure would be removed, so the stringing in this case did not have to be addressed. |
Quick aside: I was in a rush to get these done, and optimistic/overconfident. If I had more forethought, I would have printed a single part at a time until I got the settings/part right. I did this on most of the parts, but for the first couple of tries for the first part I worked on I printed the entire batch. Don’t repeat my mistakes: print only one part at a time, until the part prints as you want it to. And keep in mind that issues may crop up when you have multiple parts that didn’t occur when you only printed one part; just because the print worked with one part, does not mean success is guaranteed for multiple parts.
Now, you may notice that those parts don’t look exactly like the CAD fires. They have a flat structure underneath (the raft), and in some spots (especially the eye sockets of the raven skull) excess material (support structure). These excess pieces of plastic are there because they were necessary for building the part; however, we don’t want them on the final part.
The solution here is good old fashioned cleanup with tweezers, pliers, and a file. The tweezers and pliers were used to pull off the support structure and rafts (which print in such a way that they come right off); the file was used to clean up any leftover material.
Next, any secondary machining operations we needed to do were done. On a number of pieces, I drilled out some holes so that these could be looped on necklaces. If I had rushed less, I would have designed the parts to be printed with the hole (including the ones we took from an online depository; these files can usually be modified as needed, if you have CAD software, and adding a hole would have been an exceedingly simple operation). This can have some drawbacks (3D printers don’t always print holes very well, especially if they are horizontal), but in this case it probably would have simplified my life a bit. At any rate, this was done using a basic hand drill, and added maybe a couple of minutes to the entire process at most. Finally, a number of units also suffered from layers delaminating (i.e., pieces splitting apart along horizontals planes); this was easily remedied with some hot glue. At any rate, we kept our secondary machining operations to a minimum, and as such this step was relatively easy.
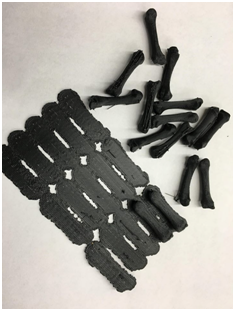 |
| Finger bones, cleaned up. The flat piece in the picture is the raft; this structure exists for printing purposes only, and is waste material (i.e., can be thrown out/recycled). |
Finally, we assembled the pieces into a test unit, to make sure they looked good. Here are the final results:
 |
| A finished necklace. The players would build these over the course of the event; we wanted to make sure that they looked good, actually fit together nicely, and were sturdy enough. This test piece used almost all of the bones we ended up printing, save for the wishbone |
We were incredibly satisfied with how the pieces turned out and looked together. Ultimately, there are some small improvements that could be made in the future (adding holes to parts, not using rafts with certain pieces, increasing the thickness in some areas, make some areas flatter, etc.). However, an important thing to keep in mind is that you are almost certainly working with a deadline and/or budget, and at a certain point you have to say, “Yes, this is good.” A common phrase in regards to this is “The enemy of the good is the perfect.” If your parts are good, and meet your standards/requirements, unless you have extra time on your hands, it’s usually not worth going back and fixing small issues until the part is perfect. At best, you’ll end up with a slight improvement for a lot of effort and wasted material (low return on your investment); at worst, you’ll end up in an infinite cycle of improvement and never actually getting the project done.
This is not to say that you shouldn’t aim for perfection; rather, that at some point, real world constraints catch up (time and money, namely). In some cases there just isn’t much you can do about the reality of the situation, and you have to compromise somewhere. It may not look like we compromised much, but that’s because we did a lot of our compromising up front. We went in and optimized for aesthetics, build time, and built material; we knew that we would suffer on the structural integrity end of things, but also knew that we could get away with some loss of structural integrity.
At any rate, that’s the 3D printing process in a nutshell. Get a CAD file, set up the print in software, do your print, identify issues, fix issues, and repeat until you have a part you are happy with. In the end, the process is one that can be a lot of trial and error, even when you fully know what you are doing. Over time, as one obtains more experience with 3D printing, you can reduce this process by quite a bit, to the point of where the only problems you are dealing with are those “strange” issues (such as the stepper motor driver overheating). As this technology becomes cheaper and more available (I personally have a DIY kit that cost less than $200; this even came with 1kg of material to work with, and requires no special tools to assemble), I think it is definitely something that event holding teams should look into and start utilizing for building props.